Drum roll..........The moment we have all been waiting for!
The Oreyoyo is officially ready to meet the world. Check out our promo video!
The
final prototype features pieces that we believe closely resemble an
actual Oreo, while also matching the performance of a mass manufactured
Yoyo.
Of course, there is
always room for improvement. In our design process, our focus was to
achieve as close a resemblance to an Oreo as possible. However, with
regards to ergonomics, the shape of the Oreyoyo is too thin for a
maximally comfortable grip. That is something we can change by modifying
the dimensions of the parts and potentially adding more parts.
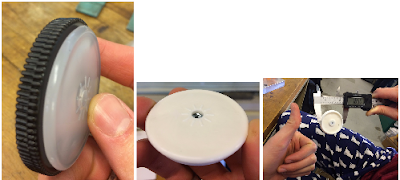
 To the left is an SLA printed early prototype of the cookie injection molded part. The advantage of SLA is that, unlike FDM 3D printing, there are no visible layers, which allowed us to achieve the intricate surface details on the cookie part. Due to the lack of parting lines and gates on the SLA prototype, it is even smoother than the injection molded piece on the top surface. However, the underside of the SLA prototype is relatively rough from support material. Lastly, while it takes little time to make one SLA piece relative to one injection molded piece (including machine time), injection molding is much faster in mass production.
Comparing Design and Measure Specifications
Here are tables comparing our design specifications to measured specifications:
Measured
Oreo cookie press-fit diameter
|
YoYo cookie press-fit diameter
|
Cream press-fit diameter
|
Thermoform gap
| |
Target value
|
46.80 +/- 0.23 mm
|
46.80 +/- 0.23 mm
|
47.05 +/ 0.23 mm
|
23.00 +/- 0.23 mm
|
Average measured dimension
|
47.01 mm
|
46.99 mm
| 47.45 mm |
23.11 mm
|
Standard deviation
|
0.0030in
|
0.0016in
| 0.043 mm |
0.1514
|
Design
Oreo cookie press-fit diameter
|
YoYo cookie press-fit diameter
|
Cream press-fit diameter
|
Thermoform gap
| |
Nominal dimension
|
47.0 +/- 0.23 mm
|
47.0 +/- 0.23 mm
| 47.5 +/- 0.23 mm |
23.1 +/- 0.35 mm
|
Reason for difference in specifications:
Cookie part
Cream part
The cream inner diameter is out of specification tolerances. Two possible reasons for this are adjusting for shrinkage too much or having too long of a hold time.
Milk part
The
averaged measured value for the thermoformed milk is within
specifications. However the 3 sigma value is outside of the tolerances,
which means that many of the parts will be out of specifications
Cost Analysis
 Now that we have small-scale manufactured 50 Oreyoyos, it's time to think about mass production. The unit costs for producing 50 yoyos we based off of the team’s total budget for the project including materials, lab time, and tooling costs. To extrapolate out to a hypothetical larger prototyping run we assumed that material costs would remain constant, molds would need to be remade every 50,000 cycles, there would be no more design, and the overhead/machine time would not decrease. The graph above show the projected total unit cost, which converges to
 $34.36.
We considered the case of using additive manufacturing for mass production, for educational purposes. We assumed that all of our parts were made by Shapeways and the non plastic parts such as the string, nuts, and spacers were sourced similarly to our lab production run. The unit cost did not change for case 2 since no matter what number we put in for quantity their quoted unit price remained at $45.42, which makes sense because there is no distributed cost as production volume increases.
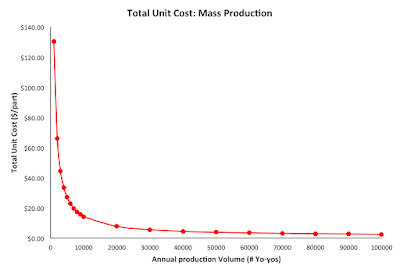
 Last but not least, we calculated the cost for mass production of 10,000 yo-yos using a high-volume process using production tooling and non-dedicated equipment. The injection molded parts were approximated together while the thermoformed part was considered separately and then added back in. To make the IM section work we multiplied the mold cost and machine cost by 4 that way we could still keep the cycle time at 30 seconds per set of injection molded parts. Additionally the machine overhead was multiplied by 4 and the machines per worker divided by 4 to account for the fact that the 4 parts were being lumped as 1. The total injection molded unit cost was then added to the thermoform unit cost to give the total yo-yo unit cost. Some things missing from our large scale unit cost would be the cost of assembly and packaging, as well as the cost of the other off the shelf components such as the nuts, axle, spacers, and string. The graph above shows the project total unit cost, which converges to $2.59.
The table below summarizes our cost analysis:
b.
|
50 yo-yos made using 2.008 prototyping
|
50 yo-yos made using AM prototyping
|
100,000 yo-yos made using high volume production
|
Unit cost
|
$34.36
|
$45.42
|
$2.59
|
Material
|
$1.92
|
--------------------------
|
$0.16
|
Tooling
|
$7.00
|
--------------------------
|
$1.30
|
Capital
|
$10.00
|
--------------------------
|
$0.01
|
Overhead
|
$15.55
|
--------------------------
|
$1.11
|
Findings
|
The dominant cost components both for our prototyping and for a high volume production run are the tooling costs and the overhead costs.This is because material is a flat rate while tooling and overhead are larger and not as diffuse. Additionally for our prototyping run our material costs are higher because we are not buying components in bulk and our capital costs are high because they are only spread over 50 yo-yos.
| ||
Design Changes for Mass Production
1. We modified the surface features of the cookie part to accommodate the smallest diameter mill tool available at the lab. With available resources, we would use the original Oreo surface features.
2. With an injection molding machine that allows us to relocate the gate, we would put it on inside of the cookie where it wouldn't be visible.
3. We would make cream in different flavors, such as mint, strawberry, etc.
4. (Slightly unrelated) We would make a deal with Oreo to add Oreyoyos as toys that come with Oreo packs :)


